Writing Your First React Hooks
React hooks were first introduced to the world in February 2019 with the release of React 16.8, and they’ve quickly become one of the library’s hottest features. However, there’s a lot to know about hooks (the official docs list ten different ones!).
Let’s start with a quick introduction to what hooks are. Simply put, they’re functions that let you “hook into” different features of React. Among the various hooks available, there are built-in hooks like useState and useReducer, which are essential for managing state in your applications.
While hooks are completely opt-in (React works fine without them), they can open up a whole new world of possibilities. In this article, we’re going to look at two hooks — and we’ll even build a couple of apps with them!
First we’ll examine useState, a hook that’s extremely handy for managing state inside your apps. It’s a great first hook to learn. We’ll also look at useReducer, an alternative to useState that will look very familiar if you’ve used Redux.
One important aspect of using hooks is understanding the lifecycle of a component. For instance, the useEffect hook allows you to perform side effects when a component mounts, such as fetching data or subscribing to events. This capability is crucial for building interactive applications.
(I’ll include links to a few different apps throughout this post — while I’ll also include plenty of code snippets to illustrate each point, feel free to open each app and play around to further your own understanding!)
Why is UseState Popular For React Hooks?
There are lots of useful hooks to choose from — for example, useEffect is one of the most commonly used, because it provides a modular alternative to React’s lifecycle methods.
However, useState is the first hook that most React developers learn, because it’s quick to pick up and implement. It’s a great jumping-off point into other hooks, including one we’ll discuss a little later. Once you’re feeling confident with hooks, you can even build your own!
Let's Build a Counter
Let’s forget about hooks for a second, and look at how we handled state prior to React 16.8. To do this, we’ll look at a simple counter app written without any hooks.

Here’s a quick rundown of how we’re handling state in this app. First, we have a single piece of state, called count. We can also decrement, increment, and reset the count.
Below are the steps we need to take to implement this in our code...
1) Declare the state using a constructor object inside our component.

2) Define each of our three methods.

3) Go back to our constructor and bind each method to this.
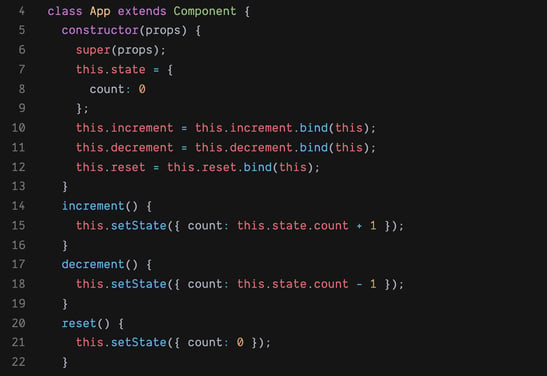
That’s 17 lines of code! Can we shorten this using hooks? Let’s give it a shot.
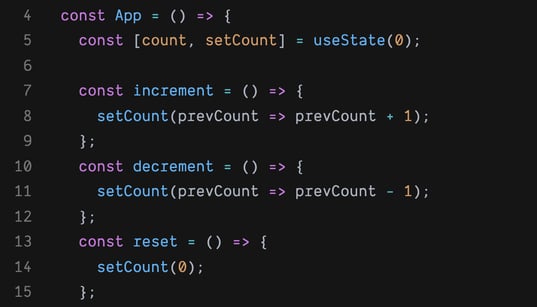
Using the useState hook, we managed to condense our state management logic into just 10 lines of code. (Click here to see how it looks in the context of the whole app!)
We’ll go over what’s actually happening later in this article, but note how much cleaner our code already looks. We declare our state on line 5 (instead of packing it inside a constructor function), and we define our methods directly below it. Another thing to note is that we didn’t need to bind our methods to this, saving us a lot of space in our code.
One reason that hooks are so powerful (and popular) is that they let us modularize the logic inside our React components. In just a few lines, we declared our state and our methods. All without dealing with unnecessary constructor functions or this binding.
Now that we’ve seen some of the benefits of hooks, let’s dive a little deeper.
Getting Ready for Hooks
There are a few things you need to know before you build your own hook in your React apps.
First, a quick note about class components and function components (also known as “functional components”). If you’ve never worked with hooks before, you’ve probably written a lot of class components like the one below (let’s omit the constructor for now).
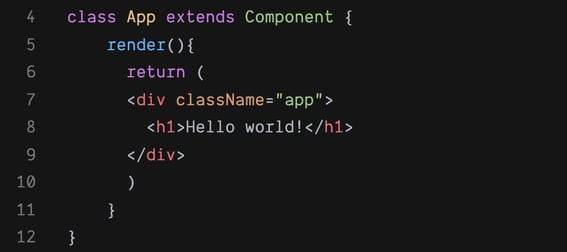
When using hooks, you need to use function components. Functional components aren’t new to React — in the past they were known as “stateless” components because they could not declare a state object of their own.
However, hooks like useState and useReducer give you the ability to initialize state inside a functional component. We’ll write our component as an arrow function, although you can also write functional components with the function keyword (just as you can declare functions both ways in modern JavaScript).
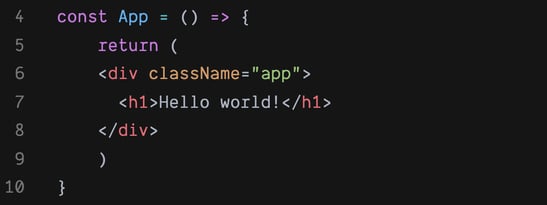
Note that we’ve imported the useState hook from React on the first line. Whenever you want to use a hook in a component, you need to import it the same way.
However, there’s one big problem with this component. We aren’t actually using useState. Let’s change that.
How to Implement UseState
In its simplest form, here’s what the useState hook looks like.
Remember, before implementing useReducer, you need to ensure to import React along with the useReducer hook.
Inside the square brackets, we’re creating a piece of state called count. We’re then creating a function called setCount that sets the value of our count state.
On the right side, we’re setting the value of count to 0.
You can name the items inside the square brackets whatever you want. The convention is to use the pattern shown above, where the name of the second value is the same as the first, but with “set” in front of it. These values — the state label and the function that modifies it — are sometimes called the getter and setter.
If you want to dig deeper into what’s actually happening here, check out MDN’s section on array destructuring, or read the introduction to the useState hook in the React docs.
What if we wanted to add another piece of state? A second counter, for instance? Easy — just stack them.

The setter function works similarly to this.setState, but it’s a little cleaner.
For instance, if we wanted to reset the count to 0, we could make a tiny “reset” function.
OK, and what if we wanted to create an “increment” function? (No peeking above!) It might seem logical to reference the “count” state and just increment it, right?
While this may feel right, following this pattern can lead to bugs. For instance, if you run five increment functions at once, the count won't go from 0 to 5 — it'll increment to 1!
Instead, you can write an anonymous function inside the parentheses after setCount. The function parameter gives you access to the current state right when setCount runs.

If you ran this function five times at once, our count would increment to 5.
Great — now we’ve learned how to declare and set state using the useState hook!
UseReducer - An Alternative To UseState
useState is a powerful tool for your React toolbox, but it’s far from the only hook that manages state. If your app’s state is more complex — for instance, if you have a form component with inputs for a user’s name, email, password, phone number, and so on — you might choose useReducer.
As its name implies, useReducer lets you set up a reducer function to handle state changes. The implementation of this hook will seem very familiar if you’ve used Redux before — however, unlike Redux, useReducer is meant for handling state inside a single component rather than for your entire app.
Let’s use a simple to-do list as an example.
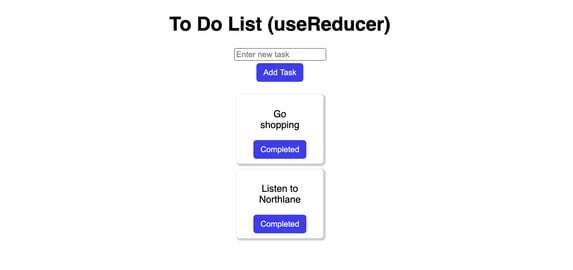
Here’s an example of the useReducer logic for the list. (View the whole app here)

Let’s compare that to how we would implement useState for that same list (or check out the refactored app here).
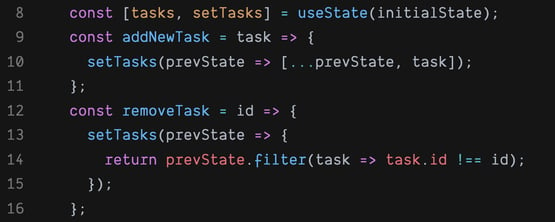
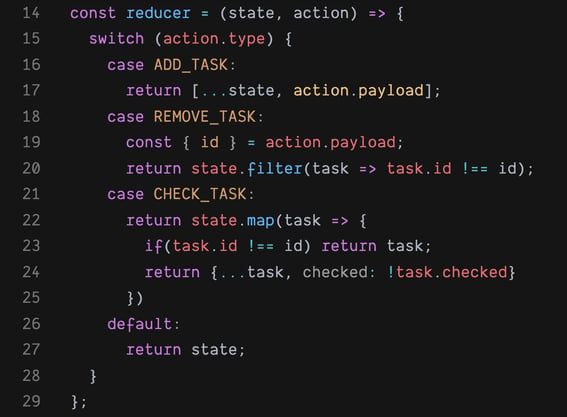
While the useState implementation is shorter, the useReducer version is much more scalable. Currently, we can add and remove tasks. But what if we wanted to introduce other features, like being able to “check off” a task before permanently deleting it? In that case, we could very easily create a “CHECK_TASK” action and integrate the logic into our reducer function.
Writing Your First React Hooks: Next Steps
In this post we learned what hooks are — functions that “hook into” React features. We also learned about useState and useReducer — two powerful hooks for managing state in your React apps. The beauty of these hooks lies in their ability to simplify how state changes affect component renders, making your applications more efficient and easier to understand.
It’s interesting to note that neither of these hooks actually change how state works in your apps. If you wanted, you could strip away the hooks in our to-do list and refactor the app to use traditional class component state. But now that you know how hooks like useState and useReduce make state management so much more intuitive... would you really want to?
APP EXAMPLES IN THIS POST
REFERENCES
More on Writing Your First React Hooks
Does the order of React Hooks matter?
Yes, the order of React Hooks is very important. Hooks should always be called in the same order on every render, as React relies on this order to correctly associate state and effects with their respective components. If the order changes, it can lead to unexpected behavior and bugs, such as state values being associated with the wrong component or function. This is why Hooks must be called unconditionally, meaning they should not be placed inside loops, conditions, or nested functions. Maintaining a consistent order allows React to manage state and effects properly.
When to create custom Hooks?
You should consider creating custom Hooks when you find yourself reusing stateful logic across multiple components. Custom Hooks allow you to encapsulate logic that can be shared, making your code cleaner and more maintainable. They can also help reduce duplication by abstracting complex logic that might involve multiple Hooks or side effects. For instance, if multiple components need to handle form input or fetch data from an API, a custom Hook can simplify this functionality. Ultimately, custom Hooks enhance the reusability and organization of your code.
What are the 2 rules that must be followed while using React Hooks?
The two fundamental rules for using React Hooks are:
-
First, only call Hooks at the top level of your React function components or custom Hooks. This means they should not be called inside loops, conditions, or nested functions.
-
Second, only call Hooks from React function components or custom Hooks, not from regular JavaScript functions.
Following these rules ensures that React can properly manage the Hooks' state and lifecycle, preventing unpredictable behaviors and bugs in your application.
What is a common mistake in creating React Hooks?
A common mistake when creating React Hooks is failing to follow the rules of Hooks, particularly the rule about calling them unconditionally. Developers might place Hooks inside conditional statements or loops, leading to inconsistent behavior and potential state mismatches.
Another frequent error is not properly managing dependencies in effect Hooks, which can cause performance issues or unexpected behaviors. Additionally, naming custom Hooks incorrectly (not starting with "use") can confuse other developers and lead to misuse. These mistakes can undermine the benefits of using Hooks and complicate component logic.
